Her gün sizlere, piyasa değeri onlarca dolar olan bir programı tamamen ücretsiz olarak sunuyoruz!
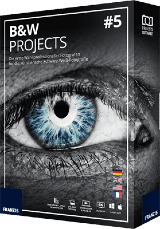
Giveaway of the day — BLACK & WHITE projects 5 (Win&Mac)
BLACK & WHITE projects 5 (Win&Mac) giveaway olarak 20 Ekim 2023 tarihinde sunulmuştu
Discover the expressive power and beauty of black and white photography! BLACK & WHITE projects 5 makes awe-inspiring masterworks out of your photographs. You can achieve the high-end professional results you’ve been striving for by utilizing the various presets, high-value expert filters, professional film emulation effects and the perfectly adjusted tonal value transformation function.
Sistem Gereksinimleri:
Minimum: Windows 10/ 8/ 7, 32 Bit, Prozessor Core Duo, 2 GB HDD, 1.280 x 1024 Pixels Screen Resolution, Graphic: DirectX-8-compatible, 128 MB, 32 bit colour depth; Mac OS X ab 10.7, 64 Bit, Prozessor Intel/G5, 2 GB HDD, 1.280 x 1024 Pixels Screen Resolution
Yayıncı:
FRANZIS Verlag GmbHWeb sayfası:
https://www.projects-software.com/deal/bw5Dosya boyutu:
235 MB
Licence details:
Lifetime
Fiyat:
$69.00

BLACK & WHITE projects 5 (Win&Mac) üzerine yorumlar
Please add a comment explaining the reason behind your vote.
So without much ado here's a (yet again, though less than last time) updated version of my guide to using it... I seem to spend a noticeable chunk of my life writing these things for the Franzis tools, but I think this is an excellent tool and I'd like people not to be put off by any learning curve. Oh and the Franzis stuff is usually a pain to register if you haven't done one before, but do persevere as IMHO this is a good one. I'd use a real e-mail address to register rather than a temporary one (like 10minutemail.net), as it'll help next time they give something away (Sharpen Projects Pro is fabulous BTW). Okay, ado over...
Personally I think BWP is the best B+W conversion tool available (note I paid for it), either if you spend the time to learn it, or even if you just dive in and ignore many of the features. You can do an amazing variety of images that look completely different from one starting image. I once did 19 B+W versions of a starting colour image for someone, and would maintain all were significantly different.
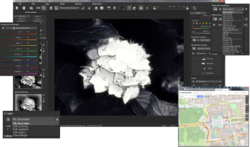
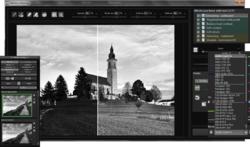
To use - Load a picture, play with the canned effects on the left side, play with the Film Type on the right side panel (which should start on the “Finalise” tab). At the top of that panel you can choose a colour filter to apply to the original (assuming it's a colour image, the same as putting a filter on the lens and using B+W film), either as a preset or use the sliders (the presets just move the sliders, e.g. Yellow -> 60/120). At the bottom of the panel you can select toning options (which would be a printing technique back in the day), which is the same theory of having a collection of presets which set sliders.
Changing to "Expert" in the right panel you can add filters from the list at the top, select them in the middle of the panel and tweak their effects at the bottom (may need scrolling down). (I'd ignore that until you are comfortable using it.)
The boxes at the top of the left panel just filter the list of presets that are shown in the panel, so ignore them initially (although using the favourites stars to select presets you like and then filtering on them is handy). On a decently fast computer you can use the Eye icon on the toolbar to disable the preview mode and show the final image in the main window, which IMHO is worth doing.
When saving the final image note that the first dialog, where it asks for the title, is going to write that over the image, it isn't the file name. That is the point you do cropping though.
The main disadvantage is the lack of full Undo operations.
The thing to get your brain around is it a huge pile of image processing tools, which are gathered together into presets in the left pane. All those presets do is select a bunch of processing tools and choose options for them, so they are infinitely tweakable in the Expert tab of the right pane once you're up to speed (and if you want to). IMHO there is no need to tweak anything in Expert 99% of the time. (Although stuff like modifying a vignette can be handy sometimes.)
BTW I bought a copy of BWP Pro retail some time ago, but when they had a discount price - which they do quite often, so I'd say rather than paying the full price for Franzis' stuff (if you're not in a rush) just sign-up for the newsletter and see if a deal appears, which it usually will. Basically 99% of the B+W images I post online came out of B+W Projects.
(I don't know if the Standard version comes with Raw support, but if it does, or you upgrade to a paid version, the next part is on Raw file importing... otherwise skip this part.)
Usually the GAotD releases come with an old Raw file import library (e.g. from 2014) so straight-out-of-the-box won't support more recent cameras. However you can just copy a later version of FreeImage.dll over the one in the program's directory to help with that (although it's still not completely up-to-date).
Look in "C:\Program Files\Franzis\BW projects 5" and see it has an old version of FreeImage.dll, which is the library that decodes Raw images from your camera (you don't care if you only plan to use it with JPEGs). I replaced this with the newest version I have (once I've shut the program down so don't have a sharing error) which is:
FreeImage .dll 6924,800 .a.. 26-02-19
Alas while in the past you could download later versions from Franzis the downloads haven't been updated (I just checked, they are still on a 2016 version) so you have to go to:
https://freeimage.sourceforge.io/download.html
and download the DLL (second link down the page)
Unzip the archive and choose the correct copy (x32/x64 - if you're running the 32-bit version of Windows your computer won't have a directory "C:\Program Files (x86)") of FreeImage.dll from FreeImage\Dist (which is 3.18.0.0, same as the one I used). I did install and test this exact file and it does work with supported cameras. You don't need the archive afterwards.
Note these are still not completely up-to-date, so recent cameras may not have Raw support and you have to use the JPG or make a 16-bit TIF file in your favourite Raw processing software.
If you have a Mac you'll need to get the OSX version of FreeImage from SourceForge and replace the existing one, wherever it might be.
Good luck and enjoy!
P.S. If it doesn't look good on your high-DPI display (i.e. 4k/5k monitor) I'd recommend, on Windows 10 (probably 11 too, but I haven't tried it), that you right mouse button the program's icon, select Properties, then the Compatibility tab, click "Change high DPI settings", tick "Override high DPI scaling..." at the bottom of the next dialogue and select "System (Enhanced)", or if that doesn't work well then "System".
P.P.S. one other thing, sometimes they screw up and send English users an e-mail in German rather than English, just be laid back about it... it's part of their charm (err...)
Save | Cancel
Requests activation serial?
Save | Cancel
hamo,
The registration process is always described in the readme file.
Please refer there every time you install any GOTD program.
GOTD team
Save | Cancel
I signed up and they have sent a serial but when I enter it it says incorrect serial?
Save | Cancel
philby1,
there is User ID and a long reg number, please don't mix those.
Also watch the blank spaces at the beginning or at the end.
GOTD team
Save | Cancel